
Next.js environment variables fail silently - unless you force them to fail early.
It's like a loaded gun on the wall. Everything looks fine - right up until it goes off in production.
- Miss one required variable → production breaks, hard to notice. Best case, the build fails. Tests won't save you if they don't run with real production env values.
- Expose a secret to the client → it's public the moment you deploy. These leaks are hard to spot and almost always found too late.
- No TypeScript safety for env vars → mistakes move from compile time to runtime, everything will work locally, but not in prod :)
I learned these lessons the hard way: about ~$1k in losses and a brief service downtime. Honestly, a pretty cheap lesson - thanks to a bit of luck with detection and good monitoring, though it wouldn't have happened if I'd done it right from the start. In this article, we'll make our environment variable setup bulletproof.
This article assume your familiar with process envs, if not please check https://nextjs.org/docs/pages/guides/environment-variables
Solution
It's easy to build an MVP where everything works (at least on your machine 😅), but once you hit production - with SLA/SLOs, multiple environments, services, and on top of that multiple Next.js execution contexts (server, client, build) - hard-coding configuration in the codebase stops being viable. At that point, configuration has to move into environment variables.
To use them without headaches, we need a few things:
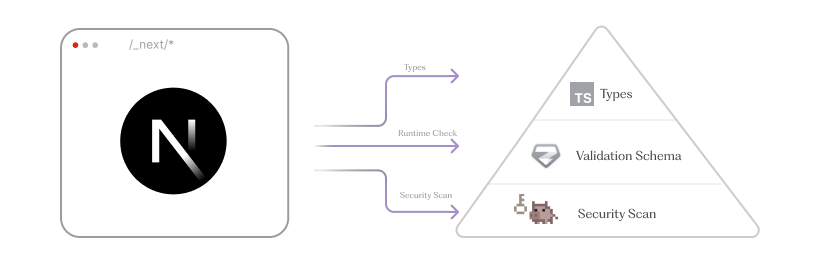
- Types → prevents "wrong usage" at dev time
- Runtime validation → prevents "wrong/missing value" at startup (build on CI)
- Security scan → prevents "secrets" shipped to client bundle
Without further ado, let's look at each piece in depth.
Types
Let's start with basics and add types for our process.env, for that we need to create environment.d.ts - so that it will be automatically added into global types, also all major IDE will automatically include it.
*(If your prefer different file name, include your types files into tsconfig's "include")
import 'next'

declare global {
    namespace NodeJS {
        interface ProcessEnv {
            CF_CAPTCHA_SCRIPT_URL: string
            CF_CAPTCHA_SITE_KEY: string
            SENTRY_DSN: string
            OPENAI_API_KEY?: string
        }
    }
}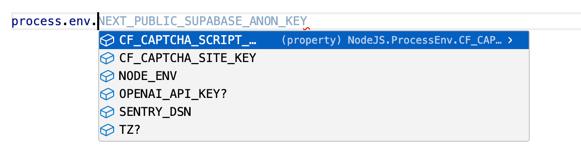
Congrats you already solved a lot of problems and now your process.env usage should be pretty straightforward, but job's not finished.
Runtime check
Now that we have types lets add runtime check, for that we could use any type schema validator we have, it could be
zod, yup, valibot etc.
From the validator, we want two things: runtime validation and TypeScript types. We don't want to define them in two separate places.
Let's create /src/env.ts file, central place to access our environment variables:
import {z} from 'zod'

const EnvSchema = z.object({
    ENV: z.enum(['dev', 'prod']).default('dev'),
    SENTRY_DSN: z.string().url(),
    CF_CAPTCHA_SCRIPT_URL: z.string().url(),
    OPENAI_API_KEY: z.string(),
    CF_CAPTCHA_SITE_KEY: z.string().min(1)
})

export type EnvType = z.infer<typeof EnvSchema>

export const env = EnvSchema.parse(process.env) // <- EnvType
Now that we defined our schema in the EnvSchema we got two things in one:
parse- validates ourprocess.envsynchronously and fail if smth is wrongEnvType- can be used for typing, along with the exportedenv
In most cases, this is enough. But we can do more and add extra checks - specific to the environment.
for that we can add:
EnvSchema.superRefine((cfg, ctx) => {
    const isProd = cfg.ENV === 'prod'
    const isStagingSiteKey = cfg.CF_CAPTCHA_SITE_KEY?.includes('x00000000000')
    if (isProd && isStagingSiteKey) {
        ctx.addIssue({
            code: z.ZodIssueCode.custom,
            path: ['cfCaptcha', 'siteKey'],
            message: 'Test siteKey value is not allowed in production.'
        })
    }
})
If we end up having staging key for CF_CAPTCHA_SITE_KEY in prod it will fail.
In general, I find it useful to use a centralized module (a single file) to access environment variables instead
of process.env. If you prefer a global approach, we can do it like this:
declare global {
    namespace NodeJS {
        interface ProcessEnv extends z.infer<typeof EnvSchema> {}
    }
}
Now that we've added runtime checks, it's important to understand when they can fail:
- Build time - ideal place to fail. The app won't be deployed with invalid configuration. In practice, this is what happens in ~99% of cases.
- Client or server runtime - this is a failure you catch too late. It means the build can differ from runtime for various reasons, and we need to handle that.
When a failure happens at runtime (client/server), you generally have two options:
- Fail hard and report an error - the user may see a blank screen, or an API may be unavailable.
- Fail gracefully - run with a partially invalid configuration while reporting the error.
T3 ENV
Plain Zod covers most cases just fine. But it’s worth mentioning an alternative if you need a bit more structure:
- clear server vs client separation, with helpful errors when variables are misused
- a framework / validator-agnostic approach that scales beyond a single setup
- better DX
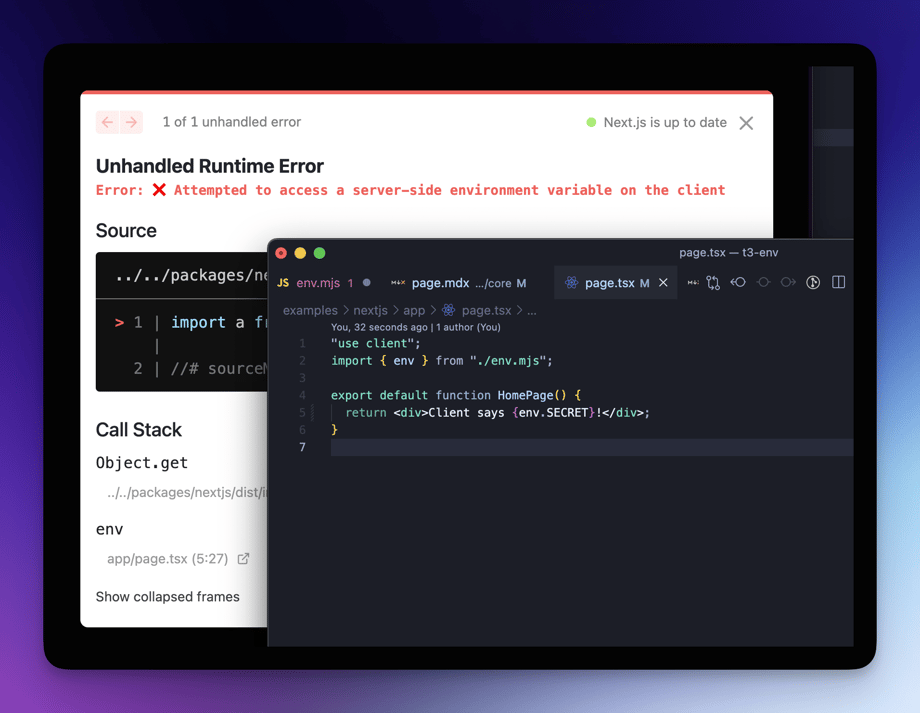
In that case, t3-env is a good fit.
import {createEnv} from '@t3-oss/env-nextjs'
import {z} from 'zod' // also supports other validators

export const env = createEnv({
    server: {
        SENTRY_DSN: z.string().url(),
        OPENAI_API_KEY: z.string()
    },
    client: {
        NEXT_PUBLIC_CF_CAPTCHA_SCRIPT_URL: z.string().url()
    },
    runtimeEnv: process.env
})
The key win: if you try to access a server-only variable in client code, you’ll get a clear error - on top of type safety and runtime validation.
Security Scan
Types and runtime validation protect how env vars are used. They do not protect what actually ships to users - client bundle.
In Next.js, any value that reaches client code (directly or indirectly) is inlined at build time. If a secret leaks there, no runtime check can save you - it's already public.
To close this gap, we add a post-build security scan using TruffleHog https://github.com/trufflesecurity/trufflehog
What we want from it:
- Detect "secrets" accidentally committed to the repo
- Detect "secrets" embedded into the client bundle
- Fail CI before users download them
To install TruffleHog, follow the official docs: https://github.com/trufflesecurity/trufflehog?tab=readme-ov-file#floppy_disk-installation You can also skip the installation and run it directly via Docker.
Scan the client output, not just the repo
Most teams scan source code. That's not enough for Next.js.
We must scan what we ship, not what we wrote.
After next build, client assets live in .next/static.
That's where NEXT_PUBLIC_* values and inlined constants end up.
next build

trufflehog filesystem .next/static \
	--no-verification \
--results=unverified,unknown,verified- Why
--no-verification? Because even test keys, partial keys, or truncated secrets are a problem once shipped. Verification is optional - exposure is not.
What we could/should improve?
- We should also add pulling production env variable:
vercel env pull .env.production --environment=productionto test on real production like build. - Check source code as well as git history - it's pretty straight forward with trufflehog (
trufflehog git)
Conclusion
If you rely on untyped process.env, assume staging equals production, or trust that secrets won't leak to the client,
you're relying on assumptions.
Next.js doesn't guarantee any of them.
The fix is small: add types, runtime validation, and scan what you ship. Do that, and most failure modes disappear.
Best part? You only need to learn this lesson once - ideally without an outage.
Useful Links
-
next-runtime-envHelps avoid Next.js environment variables being frozen at build time. Useful when you need runtime config or reusable Docker images. -
trufflehogScans repositories, git history, and build output for leaked secrets. Works well as a CI safety net before anything ships. -
t3 envFramework-agnostic environment variable validation with explicit server/client separation. -
Env type safety & validation A deeper dive into the first two topics, with practical examples of typing and validating environment variables.